|
For accurate “S-TTL” Auto Exposure Control
More
accurate and stable S-TTL Auto Exposure is acquired by devising method of attaching
D-2000 to housing/protector.
●Requirement
for S-TTL Auto Metering System
S-TTL Auto Strobe synchronously flashes with
pre-flash/main flash of camera’s built-in flash. So S-TTL Auto Strobe needs
not only start signal of the built-in flash but also needs stop signal while
conventional 「External Auto
Metering」 and 「Manual Metering」 only require start signal of built-in flash.
(External strobe itself meter light amount and quench)
Therefore S-TTL Auto Strobe requires sensitive/high precision slaving
function and method to effectively/reliably transmit built-in flash light.
●Connecting
method for stable “S-TTL” Auto
INON D-2000 Auto Strobe is equipped with high
sensitive/precision slaving function to comply with above requirement.
In most cases, S-TTL works without problem when D-2000 Strobe and camera
system are properly connected via respective Optical D Cable/Cap W Set
exclusively designed for compatible camera system and effectively/reliably
transmits built-in flash light.
However
in some case like “dirt of Optical Cable edge ”,”dirt of diffuser panel of
housing/protector” or “strong ambient light” etc affect to accuracy of
S-TTL. So there is possibility to acquire more precise/reliable S-TTL
Auto Exposure by taking measures mentioned below.
Modification
could be applied for following housing/protector
*Olympus PT-005
*Olympus PT-007/010/016
*Olympus PT-012/014
*Other S-TTL compatible housing/protector
Before starting following modifications, please read/understand
instruction manual/warranty statement of housing/protector and INON Inc. and
below precautions
1)
Disassembly of housing
diffuser or any other modification (hereafter refer as “the modification”) is
nothing concern with respective manufacturer. Please DO NOT inquire
this modification of manufacturer. Please note that whole responsibility of this modification belongs to
user.
2)
The modification may void
warranty of housing/protector even though within warranty period. Please
refer instruction manual/warranty statement of the housing/protector for
detail.
3)
INON Inc. assume no
responsibility whatsoever for any damages (damage to housing/protector,
damage to housing/protector accessory, damage to a camera) resulting from the
modification.
4)
INON
Inc. assume no responsibility whatsoever for any incidental damages resulting
from the modification.
5)
DO NOT proceed any further the modification unless
you understand above statement. When you do not make the modification, S-TTL
still properly works though accuracy/reliability of S-TTL Auto Exposure could
be slightly degraded.
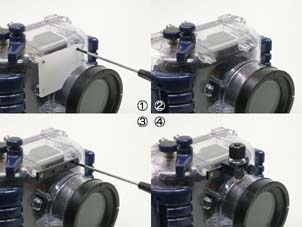
Modification of Olympus PT-005
1. Install [Cap W2 Holder Spacer] after removing diffuser panel of the
housing (See images below ①/②/③).
2. Attach [Cap W2 Holder Unit] on the [Cap W2
Holder Spacer] (See image below ④ )
*Removed diffuser panel and screws should be kept
when you need to restore to original condition.

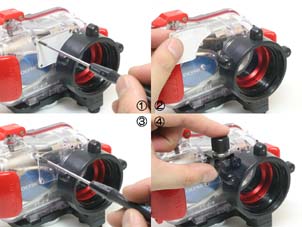
Modification of PT-007/010/016 (image shows PT-016)
1. Remove diffuser panel of housing/protector
(translucent white) and diffuser panel (transparent) of housing/protector
2. Reinstall transparent diffuser panel
3. Attach [Cap W2(PT-007/010) or Cap W8 (PT-016)
Holder Unit] on the transparent diffuser panel.
*Removed diffuser panel and screws should be kept when
you need to restore to original condition.

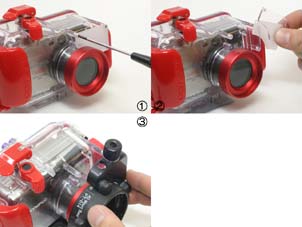
Olympus PT-012/014(image shows PT-014)
1. Remove diffusers of housing/protector
2. Attach [Cap W4 (PT-012) or Cap W6/W13(PT-014)
Diffuser Unit] on respective AD/M67 Mount Base
3. Attach the AD/M67 Mount Base on the
housing/protector
*Removed diffuser panel and screws should be kept when
you need to restore to original condition.

Other
housing/protector
Properly attach respective Optical D Cable/Cap W
Set with following instruction manual.
Especially pay close attention to following points
for specific housing/protector mentioned below.
Nikon WP-CP1/CP2 (No image)
1. Remove diffuser panel of the housing/protector
2. Attach [Cap W12 Diffuser Unit (WP-CP1) or Cap
W11 Diffuser Unit (WP-CP2)] on respective AD Mount Base.
3. Attach the AD Mount Base to the
housing/protector
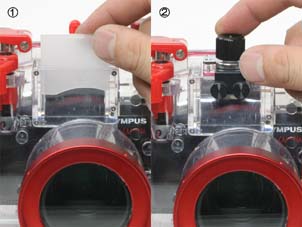
Olympus PT-020/022/024 (image shows PT-022)
1. Pull out and remove diffuser panel(translucent white) by hand
2. Attach Cap W9(PT-020) ,Cap W10(PT-022) or Cap
W15(PT-024) Holder Unit on diffuser panel(transparent).

●Other points to notice
for “S-TTL” Auto Metering
Please check once again following points mentioned
in D-2000 user manual (*1)
・To check if your camera/housing
is compatible for “S-TTL” Auto
P.30 – P.31 in D-2000 User Manual (Basic Operation)
・To check if specified
Optical D Cable/Cap W Set or other accessory being used for your
camera/housing.
P.19 – P.24 in D-2000 User Manual (Basic Operation)
・To check if “Clear Photo System” is being used
P.28 in D-2000 User Manual (Basic Operation)
・To check if Light Filter Sticker (Red) is attached
on built-in Focus Light
P.33 in D-2000 User Manual (Basic Operation)
・To check if edge of Optical D Cable is not damaged
by dirt
At the same time, we recommend to review Strobe output adjustment methods
necessary to caribrate each camera’s strobe
metering characteristic.
P.33, 35 – P.40 in D-2000 User Manual (Basic
Operation)
(*1) D-2000 English User Manual [Basic
Operation] is now under printing and will be distributed from January 2005
through overseas INON authorized distributor/dealer for current D-2000 user
who purchased from respective overseas INON Authorized distributor/dealer.
The English Manual will be included together with the product for INON
approved export model.
Dec. 24nd , 2004
INON Inc.
|